Category Archives: Tutorial

Tutorial: how to line the Papercut Rigel bomber jacket

My current project (well, my just-completed-but-no-photos-yet project, really) is the Rigel bomber jacket by Papercut Patterns. I made one key change to the pattern while sewing it up – I added a lining. Which, from looking around the blog-o-sphere, is something that quite a few people have done, or want to do. So, in case it’s useful for anyone else, here’s how I lined my Rigel bomber jacket….

Rigel bomber from Papercut Patterns

Now, usually linings in jackets have more ease than the jacket itself – if you look at any tailored, lined RTW jacket you’ll usually see it has a small pleat at the centre back just below the neckline facing, and the lining is also longer at the hem and sleeve cuffs and bags out slightly. Since the Rigel bomber is a loose-fitting style (and since I wanted to do a quilted lining for my jacket) I haven’t added any of that extra ease – instead, the lining pieces I made were directly from the main jacket pieces. (It’s pretty easy to add the extra ease if you want it though – simply make your lining pieces longer, and add a small extension at the top of the centre back seam of the lining.) So with that in mind, let’s get started!

Cutting the lining

Three new pattern pieces need to be made for the lining – front, back and sleeves. Start by tracing the original front, back, and sleeve pieces. (Note: use variation 1 sleeve as a base for the lining, no matter which variation you’re making.) Remember to mark on all three pieces that they’re for the lining!

Trace the front, back and sleeve pattern piecees

Trace the front, back and sleeve pattern pieces

Front lining

Trace the facing pattern piece onto your front lining piece, lining up the edg of the facing with the edg of th front lining, and making sure . (It’ll be the same width as the front extension.)

Place facing on front lining pattern piece

Place facing on front lining pattern piece

Facing traced onto lining pattern piece

Facing traced onto lining pattern piece

Add 2cm seam allowance from the line you just traced, towards the centre front seam. (Why 2cm? Because the original facing piece doesn’t have seam allowance on the open edge. Since we’re now going to be attaching another piece to it, we need to allow for seam allowance for both sides of that new seam. It’s easier to add it to the new lining piece rather than mucking around with two pattern pieces.)

Draw a line 2cm towards centre front seam

Draw a line 2cm towards centre front seam

Cut along your new line – the larger piece is now your front lining. Yay! (You won’t need any lining on the front extension of the jacket as the facing will take care of that part, so just cut straight across from the bottom of the lining piece to the new line you made.)

Cut along line

Cut along line

Back lining

Trace the facing pattern piece onto your back lining, with the neck edges aligned. The curved end of the facing is the one that lines up along the back, as this will follow the curve of your neck. The facing has a centre back seam and the back lining won’t, so we’ll need to adjust for this – simply let the facing piece overhang at the centre back by 1cm.

(Note: if you’re wanting to incorporate an ease pleat in your lining (that little pleat you see in the lining of most fitting jackets near the back neckline) this is when to do it. Once you’ve got your back lining traced out, simply extend the back neckline of the lining by 1cm at the centre back and connect the new point to the bottom of the centre back with a straight line. Remember to mark where the ease is, so when you sew it up you can create a small pleat there.)

Place facing on back lining pattern piece, overhanging by 1cm at centre back

Place facing on back lining pattern piece, overhanging by 1cm at centre back

Facing traced onto lining pattern piece

Facing traced onto lining pattern piece

Add 2cm seam allowance towards the outside edge.

Draw a line 2cm towards neck edge

Draw a line 2cm towards neck edge

Cut along your new line.

Cut along line

Cut along line

Sleeve lining

Rather than messing around with figuring out which part of the facing to trace onto the sleeve, we’re simply going to measure it. The facing is 8.5cm wide. So, to allow for the 2cm seam allowance that needs to be added, measure down 6.5cm from the upper edge of the sleeve, and draw a line that follows the curve of the sleeve.

Draw line 6.5cm below edge

Draw line 6.5cm below edge

Cut along your new line.

Cut along line

Cut along line

Sewing the lining

Cut out and stitch the lining pieces together the same as you would for the jacket shell – attach the sleeves to the front lining pieces, and also to the back lining piece.

Attaching the facing to the lining

Pin the centre back seam of the facing to the centre back of the back lining, right sides together. The facing will be curving downwards.

Pin facing to lining, aligning facing centre back seam with centre back neckline

Pin facing to lining, aligning facing centre back seam with centre back neckline

Pin the rest of the facing to the lining. Make sure the distance from the end of the lining to the end of the facing is the same as the front extension, i.e. 7cm. You’ll need to ease the facing onto the lining, due to the difference in curvature at the edges.

Facing extends by 6cm at the bottom

Facing extends by 7cm at the bottom

Press the seam towards the facing.

Your lining is now finished, and ready to be sewn into your jacket shell.

(Note: the fabric at the end of the sleeves of my lining is the same as my facing, because of a late pattern adjustment to lengthen the sleeves. Just in case you’re wondering why the lining fabric doesn’t extend right to the end of the sleeves in these and the following photos. I has long gorilla arms. :-p )

Lining with facing attached

Lining with facing attached

Lining with facing attached

Lining with facing attached

Sewing the jacket shell

Stitch up the jacket shell as per the instructions, with the following changes:

  • when attaching the bottom ribbing, stitch the short end onto the front extension with a 1cm seam allowance, rather than folding the front extension under and topstitching to attach the ribbing
  • don’t topstitch around the bottom ribbing (or you’ll have trouble attaching the lining!). Instead, press the seams of the ribbing towards the jacket body
  • when you get to the instructions for attaching the facing, skip over these and go and attach the sleeve cuffs instead

Sewing in the lining

Attaching the lining to the jacket body

Pin the lining onto he jacket as per the instructions for attaching the facing, and continue pinning all the way along the bottom of the jacket as well. Make sure the bottom ribbing is folded inside, just like the neck ribbing is, so it doesn’t get caught in the stitching).

Sew the lining to the jacket, leaving a 10cm gap for turning the jacket back around the right way (I left my turning gap at the bottom of the jacket). Tip: When stitching, have the shell fabric on the top, so that you can follow the stitching lines for the zip and ribbing to get the lining perfectly aligned on the inside with no stitching showing.

The tricky bit will be the corners of the ribbing along the bottom of the jacket – follow the line of stitching that you made when attaching the ribbing to the jacket shell, and pivot at the corners. Clip the lining to the stitching at the corner (just as you did with the jacket shell at the same point) so it sits flat.

Turn your jacket the right way around, through the gap you left when attaching the lining. Poke out the corners at the bottom of the front extension so they’re nice and sharp, and give them a good press.

Attaching the lining to the sleeves

First, try your jacket on to make sure your lining isn’t twisted inside the sleeves. The lining should be sitting nicely inside the sleeves, with the seams of both lining and shell aligned.

Fold a small section of the seam allowance of the lining under and pin it to the shell, mimicing how it will look when it’s sewn. (Note: this pin is to make sure the lining and the shell don’t get twisted while we’re stitching the sleeve lining on, so you only need to pin a small section. One pin will be enough.) It’s a good idea to pin at or next to the seams, to make sure the lining doesn’t get twisted in the next steps. They

Pin lining to sleeve at seam

Pin lining to sleeve at seam

Reach inside the jacket through the gap you left when attaching the lining to the shell, and pull the sleeve out through the gap. The sleeve and the sleeve lining will now be next to each other, attached by the small section you just pinned.

Sleeve and lining next to each other, attached by small pinned section

Sleeve and lining next to each other, attached by small pinned section

Pinch the pinned section together so it doesn’t move, take out the pin, and repin it with right sides together and raw edges aligned so you can stitch them together.

Tuck the cuff down inside the seam so it doesn’t get caught in the stitching, and pin the sleeve and the sleeve lining together all the way around with the raw edges aligned and right sides together.

Pin lining to sleeve, with the cuff tucked inside

Pin lining to sleeve, with the cuff tucked inside

Stitch together. (Tip: stitch with the shell on top, so you can follow the line of stitching you made when you attached the cuff.)

Sew lining to sleeve, following the stitching line

Sew lining to sleeve, following the stitching line

Pull the sleeve back through to the right side of the jacket – it’ll now be all nicely lined! 🙂

Repeat the process with the second sleeve.

Finishing

Slipstitch the gap in the lining closed, give it all a good press, and you’re done! Yay! 🙂

Tutorial: how to lengthen the Papercut Coppelia top

One of my TNT (tried ‘n’ true) patterns is the Papercut Coppelia wrap cardi. I’ve made it four times now, with plans for more on the horizon! For two of those versions, I extended the pattern – one time to create a hip-length wrap top for my sister-in-law, and the other time to create a below-knee-length dress for myself.

Loganberry Coppelia | Modern Vintage Cupcakes

Dress-length Coppelia

Extending the wrap-around version of the Coppelia is pretty easy to do, and you can make it however long you want. A Coppelia maxi dress, perhaps? Or simply a slightly longer wrap top to wear over jeans? It’s up to you! Here’s how I did it….

Coppelia cardi | Modern Vintage Cupcakes

Hip-length Coppelia

Of course, most of the changes are made when you’re cutting out your pattern. Are you ready? Here we go!

Cutting out the back

The Coppelia wrap top ends on the natural waist. So when lengthening it, you need to account for your waist-hip curve.

Tutorial: how to lengthen the Papercut Coppelia wrap top  | Modern Vintage Cupcakes

Flare out gently from the waist/bottom of the pattern piece, to allow space for your hips and to move

You’ll also need to account for natural movement in the garment. This is especially important for extending the Coppelia to dress length – when you walk/sit/run/play, the movement of your body (particularly your legs) will kick the skirt fabric out wider. If you don’t make your top/dress wider as it goes down your body, you may end up flashing a bit more leg than you expect to. 😉

Aim for an a-line shape, flaring out gently from the waist (i.e. where the Coppelia pattern piece ends). Mark your extended cutting line (I used pins as tailors chalk and this fabric weren’t getting along).

Tutorial: how to lengthen the Papercut Coppelia wrap top  | Modern Vintage Cupcakes

Extend down as long as you like (in this case, a below-knee dress), in a gentle a-line shape

Then cut!

Tutorial: how to lengthen the Papercut Coppelia wrap top  | Modern Vintage Cupcakes

Cutting out the front

Like the back piece, you’ll need to widen the front pattern piece as it goes down below your waist. Since the front is cut in one piece (rather than on the fold like the back piece is) you’ll need to widen it at both sides.

You want to widen it by the same amount on each side as you widened your back piece, to make sure those side-seams line up nicely.

Tutorial: how to lengthen the Papercut Coppelia wrap top  | Modern Vintage Cupcakes

Flare out gently from the waist/bottom of pattern piece on both sides, to allow space for your hips and to move

Before you remove your front pattern piece, mark where the waist is at the side seams. (I.e. where the Coppelia top pattern piece ends.) You’ll need to know where this is later on when sewing up the side seams.

Tutorial: how to lengthen the Papercut Coppelia wrap top  | Modern Vintage Cupcakes

Mark where the waist is, i.e. where the original pattern piece ends

Cutting the ties/bindings

With the Coppelia, there are two sections of bindings that you need – for around the neckline, and for the hem. When you extend the pattern, you no longer need the hem binding as the top will no longer end at your waist.

The hem binding on the Coppelia also doubles as the waist ties, extending out from the body to wrap around. Since you won’t be adding the hem binding any more, the neck binding will be extended instead to become the wrap ties.

However, we are going to use the hem tie pattern piece to get our neck binding/waist tie piece the right length.

In the Coppelia, the pattern calls for you to cut out three lengths of the hem tie pattern. For a longer Coppelia, you’ll need to cut out only two. We’ll then be joining these onto the neck binding to create an all-in-one neck-binding-extending-into-waist-ties piece.

(If you like you can lay the neck binding and hem tie pattern pieces end-to-end to cut them out so you don’t have to sew them together – this creates a nice smooth binding piece. If you do it this way, make sure you mark where the neck binding ends and the hem tie begins as you’ll need to know this later on.)

Tutorial: how to lengthen the Papercut Coppelia wrap top  | Modern Vintage Cupcakes

If you like, you can cut the hem tie and neck binding butted up next to each other so they’re in one long continuous piece

Since I quite like long waist ties, I also extended my hem tie pattern pieces by 24cm (since they’re cut on the fold, I moved them out 12cm from the fold to get that 24cm extension). This is completely optional – like I said, I just like really long waist ties. 😉

Tutorial: how to lengthen the Papercut Coppelia wrap top  | Modern Vintage Cupcakes

If you want to, you can lengthen the hem ties

Sewing it up

Important note: I have the older version of the Coppelia, that only has the wrap-around variation. The instruction numbers below match the ones found in that version.)

Attach the sleeves as per instruction steps 1 and 2, and join the two halves of your neck binding at the centre back as per step 3. If you cut your neck binding and two hem tie pieces separately, now’s the time to join one hem tie piece to each end of your neck binding so that you have one nice, big, long tie.

Skip step 4 for now – you’ll come back to this soon.

Carry on with steps 5 and 6. With step 6, where it talks about leaving a 3cm gap 2cm up from the waist line – this is where you’ll be using that chalk mark you made when cutting out, so that you know where the waist line is. Your 3cm gap will be 2cm above that mark you made.

Tutorial: how to lengthen the Papercut Coppelia wrap top  | Modern Vintage Cupcakes

Hole for the waist tie, nicely placed just above the natural waist

Skip step 7 – you’ve already joined your hem tie and neck binding, so nothing more to do here. 😉

Now, before you go any further, there’s a bit of edge neatening that needs to be done. On the original wrap Coppelia, all the edges are nicely enclosed in the hem and neck bindings. Now that we’ve lengthened it, the sides below the waist and the bottom edge won’t be enclosed in binding, and need to be finished neatly. This needs to be done before you attach the neck binding, or else it’s going to be a heck of a lot harder to get a neat finish on those edges.

It’s up to you how you finish them – I used a coverstitch for mine, but a twin needle on your sewing machine would also work well. Another option is to neaten the edge (zig-zag or serge/overlock), fold under 1cm and stitch down. You’ll need to finish three edges – both sides below the waist (i.e. below where the neck starts heading off on an angle) and the hem.

Tutorial: how to lengthen the Papercut Coppelia wrap top  | Modern Vintage Cupcakes

Neaten the side seams below the bottom corner of the neckline

Once those edges are neatened, it’s time to attach the neck binding/waist ties. You’re going to do this using a combination of steps 4 and 8 in the Coppelia instructions. Have a read of step 8 – you’ll see it talks of attaching one side of the binding first, rather than attaching it all in one piece like in step 4. Since our neck binding is going to extend into the waist ties, this is the way you’ll want to attach the neck binding now.

Like in step 4, line up the centre seam of the neck band with the centre back neckline of the cardi. If you cut your hem tie and neck binding as separate pieces, line the join of these up with the bottom corner of the neckline. If you cut your hem tie and neck binding as one piece, find the mark you made showing where one ends and the other begins and line this up with the bottom corner of the neckline. As with step 4, pin the remainder of the neck binding to the cardi easing it in slightly. Stitch it down. (Remember, you’re only attaching one side of the neck binding at this point – the other side needs to be left loose like in step 8.)

Now jump to step 9 and stitch that waist tie together!

Carry on to step 10, only apply it to the neck binding piece instead.

Then complete step 11 to attach the cuffs.

You’re all done!

Loganberry Coppelia | Modern Vintage Cupcakes

Loganberry Coppelia wrap dress

Fitting note

Since the Coppelia is a cardigan, it’s designed to have enough ease to be able to wear it over other things. If you’re planning on turning it into a dress, I recommend cutting one size smaller than you usually would, as you’ll want a closer fit.

Tutorial: adding pockets to a princess seamed dress

I’m a big fan of having pockets in things. Being able to carry stuff, places to keep your hands warm when it’s cold out, and they even give you something to do if you ever find yourself standing around feeling silly – just put your hands in your pockets and look casual, yo!

(Plus, when you have a small person in your life, you really do find yourself needing pockets for carrying tissues/snacks/random ‘gifts’ they present to you and expect you to hold onto, that sort of thing.)

So when I made my Rock-a-birdy Bleuet dress, strangely enough, I decided to add pockets!

Adding pockets to a princess seamed dress | Modern Vintage Cupcakes

The Deer&Doe Bleuet dress is a cute, princess-seamed, shirt dress. For my Bleuet, I decided to add pockets to the side front panels of the dress – that way, they would be less likely to ruin the lines when I was carrying things in them than in-seam side pockets would be. Plus, I’d still be able to easily adjust the fit of the dress if I needed to take in (or let out!) and of the seams.

This technique would work on pretty much any princess seamed dress (or coat, or top).

Here’s a little tutorial of how I did it….

Step 1
First, we need to mark where our pocket opening is going to be. You’ll then use this marking to cut your side front panel out in two sections – upper and lower – and also to cut your pocket bag.

Draw a line on the side front panel where you want your pocket opening to be (hold it up to yourself to get it in the right spot). We’ll call this the ‘pocket line’ from now on.
Adding pockets to a princess seamed dress | Modern Vintage Cupcakes

Step 2
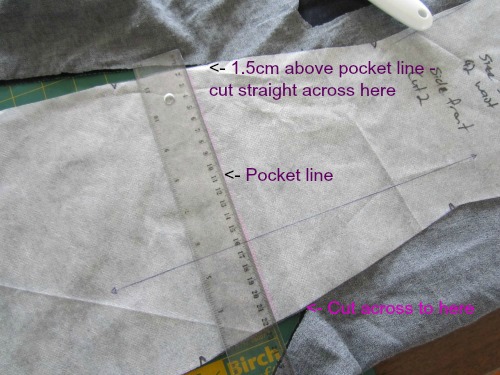
Cut lower section of side front from 1.5cm (5/8″) above the pocket line to the bottom of the side front pattern panel.

Cut straight across at 1.5cm above the pocket line. (That 1.5cm above is your seam allowance.)
Adding pockets to a princess seamed dress | Modern Vintage Cupcakes

Step 3
Cut upper side front panel to 6.5cm below the pocket line. This gives you a pocket facing so the pocket bag doesn’t show through when you’re wearing your dress. It also includes the seam allowance.

Mark the pocket line on this panel – you’ll be using this to match up where the top of the lower side front will go.

Here’s how the pocket facing works – see how far I have to pull the pocket down before you see the pocket bag on the inside? That’s what we’re aiming for – no accidental flashes of other prints when we’re carrying things!
Adding pockets to a princess seamed dress | Modern Vintage Cupcakes

Step 4
Now it’s time to cut the pocket bag!

Cut on the fold, using the side front panel as a guide. The top of the pocket bag will be 1.5cm (5/8″) above the pocket line, to give you your seam allowance.

Mark where the seam is that will join the centre front panel.
Adding pockets to a princess seamed dress | Modern Vintage Cupcakes

Step 5
Open out your pocket bag.

On one side, cut off 5cm at the top – this will attach to the pocket facing in the upper section of your side front panel. Mark this as top front.
Adding pockets to a princess seamed dress | Modern Vintage Cupcakes

Step 6
If you’re putting pockets in both sides, use your new pocket bag as a template to cut a second bag. Make sure they’re mirror images of each other (i.e. cut right-sides-together).

Step 7
Time to sew!

Right sides together, sew your pocket bag to lower front side panel, using a 1.5cm seam allowance.
Press so pocket bag and lower side front are wrong-sides together, with seam allowance flat between them. Understitch seam allowance onto pocket bag.

Right sides together, sew pocket bag to upper front side panel, using a 1.5cm seam allowance.
Press seam allowance towards pocket bag and understitch.

Here’s what it’ll look like when you open it all out, with the pocket bag joining the upper and lower side front panels:
Adding pockets to a princess seamed dress | Modern Vintage Cupcakes

Both seams should be understitched so the seam allowance is against the pocket bag:
Adding pockets to a princess seamed dress | Modern Vintage Cupcakes

Step 8
Line up top of lower side front with the pocket line you marked on the upper side front. Pin in place and press pocket bag so it’s nicely folded over.

Here’s what it’ll now look like on the front – with the lower side front end along the pocket line (and a bonus toddler photo-bomb):
Adding pockets to a princess seamed dress | Modern Vintage Cupcakes

And here’s what it’ll look like at the back, with your pocket bag folded in half:
Adding pockets to a princess seamed dress | Modern Vintage Cupcakes

Baste sides together.

Step 9
Repeat steps 7 & 8 for the other front side panel if you’re adding two pockets.

All done!

Now go ahead and use it like it’s one panel for constructing your dress. 🙂

Lining the Hummingbird skirt

Remember that Pigeon skirt I made last month from the Hummingbird pattern from Cake? And how I made a lining for it, and promised to do a post showing how I did it?

Well, the time for that post has finally arrived!

Here’s how it went…..

(Note that this could be used for either the pink or the orange version of the Hummingbird skirt.)

I didn’t do anything special for the skirt back – since the only seams are the centre back (for the zipper) and the flounce (if sewing the pink version), I just used the original pattern pieces and cut ’em out of lining as well.

For the front though, I drafted a new pattern piece. The Hummingbird skirt front is in three panels – a centre panel, and two side panels with pockets set in them. Since linings should be as smooth as possible, there was no need at all for having a three-paneled front lining, so instead I used the pattern pieces to draft a one-piece front.

However, it’s not as simple as just laying those pieces down and drawing around them. You see, there is some subtle shaping going on in that pretty Hummingbird pattern. Where the centre front panel joins the two side panels is some shaping, as though there were small darts there but they have been incorporated in the seams. Which means, you need some darts in to match the shaping. Also, those pocket pieces need to be turned into one pattern piece.

Ready to draft a lining? Here goes….!

Step 1 – join the side panel with the pocket piece

Have a look at your pattern. See those dots at the pocket corner where you match the fabric while stitching it up? Well, those need to match when making the lining as well. Overlay the side panel piece and the pocket piece, so those two dots line up and the ends of both pieces are in a smooth line.

Line up the pocket piece and the side panel

Line up the pocket piece and the side panel

At this point, you have a choice, depending on what your pattern pieces are made of. Either pin those two pieces together, or draw up a new piece by tracing them as one continuous piece.

Step 2 – Mark the seam allowance on the front panel seams

By converting the front skirt panels from three pieces to one, you’re also removing two seams down the front of the skirt. Which means you’re removing the need for two seam allowances for each panel. So, let’s get rid of those!

On your new side panel piece (from step 1), measure where the seam allowance ends on the bit that would be attached to the centre panel. This will be 1/2″ in from the edge (see those faint yellow lines in the photo below? That’s where the seam allowance ends.)

Do the same on the front centre panel, on the edge that would get joined to the side panel.

Mark the seam allowance  (in this case, 1/2" from the edge)

Mark the seam allowance (in this case, 1/2″ from the edge)

Step 3 – Remove the seam allowance

Now that you’ve marked that seam allowance, it’s time to remove it! Nice and easy – just place your centre front pattern piece overtop of your side panel piece, making sure the seam allowance markings you drew in step 2 are on top of one another.

Overlap your seam allowances

Overlap your seam allowances

You’ll have a nice 1″ wide strip where the two pattern pieces overlap – which equates to 1/2″ seam allowance on either side being removed.

Draw around the outline of all the pattern pieces you’ve pinned together to create your new front lining pattern.

Step 4 – Marking the new dart

See how the 1″ overlap between the centre front and side panels tapers off towards the top of the pattern pieces?

Overlap tapering at the top of the skirt

Overlap tapering at the top of the skirt

Yeah, that’s where that shaping is that I mentioned earlier. It’s not a huge amount of shaping – just enough to make it a nicely fitted straight skirt over those curves us girls tend to have. 😉

But for the lining, since it’s going to be one piece rather than panels, we need to convert that shaping into a dart.

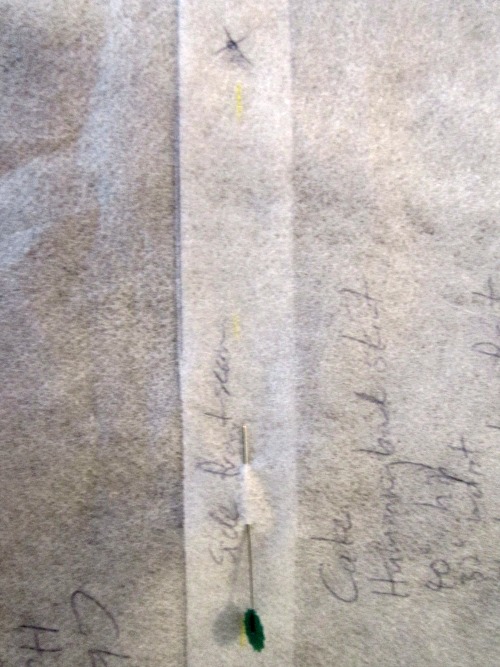
You’ll need to mark three points for this. Firstly, measure out the top width of your dart. This is the same place as where the seam allowance ends would be. In other words, measure 1/2″ in from the end of each pattern piece. (See those yellow lines near the top of the picture below?)

Next, you’ll need to mark where the dart ends. Look at your pattern – you should be able to spot where the overlap of the two pattern pieces starts to taper and reduces in width from the 1″ overlap you have for most of it. At the last point where it’s still a 1″ overlap is where you’re going to mark the end of your dart, right in the centre of that overlap. See where the yellow-headed pin in the photo below sticks into the pattern piece? That’s where the tip of my dart is – right in the middle of that 1″ overlap.

Marking the dart measurements

Marking the dart measurements

Step 5 – Draw your new dart

Now, connect the dots of your dart point and ends to draw in your new dart on your new front lining pattern piece!

Look - it's  a dart!  (Ooh!)

Look – it’s a dart! (Ooh!)

Step 6 – Put it all together!

And you’re done! You should now have one pattern piece for the front lining, complete with a small dart marked on it.

Cut it out on the fold, add it to the lining pieces you’ve cut using the regular back pattern pieces (remember to cut the tail flounce piece if you’re making the pink version of the skirt) and stitch it all up just as you would if it was the skirt itself.

Before you hem it though, remember that lining needs to be a bit shorter than the skirt shell, so it doesn’t peek through underneath. Cut a good inch off around the base, then hem as usual.

(And now you’re done. 🙂 )

How To: make a picnic blanket from tea towels

fullblanket

Remember that picnic blanket I made last week? Well, I decided to take photos (and notes) as I was making it, and try my hand at writing my first ever tutorial. What prompted me to do this? It’s Sew Grateful Week, and one of the daily prompts is to share a tutorial!

Sure, it’s not for anything overly complex, but I’m hoping it may inspire someone out there to get creative. (Plus, I find most of the tutorials I use online are for simple but fun things, and usually have nothing to do with sewing garments. So…..)

Since this is my first tutorial, I’d love to hear it if you have any feedback. What you like, what you don’t like, if anything is confusing. Basically, any ideas you have for how I can write better tutorials. (Which is also a reason I’m starting with something simple, so I can get a bit of practice at tutorial writing before I launch into explaining anything more complicated.)

Anyway, here we go…..

How to make a tea-towel picnic blanket

You will need:

  • several tea towels. I used 7, but you can use more or less, depending on how large you want your completed picnic blanket to be.
  • a single bed sheet. (If you want a much bigger picnic blanket, use a double or queen sheet.)

Step one:
Lay your sheet out flat and arrange your tea towels on top of it until you decide on a size and layout you like. (Make sure you note this layout down, so you don’t forget it when sewing everything together!) Use your sheet as a size guide – you don’t want to make the top of your blanket bigger than this.
layout

Step two:
Trim off the hemmed edges of all the tea towels you’re using, so that they’re nice and smooth to sit on.
trim hems

Step three:
Sew your tea towels together, with a 1 cm seam allowance. Press all the seams open as you go. (Note: there’s no need to finish the edges as they’ll all be enclosed once the blanket is finished.)

Step four:
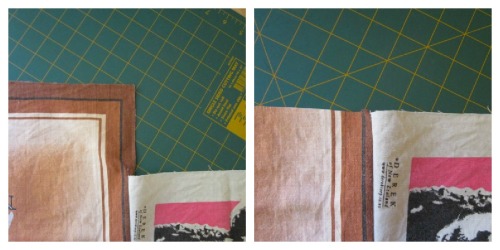
Unless you’ve managed some miracle of placement, chances are the edges of your tea towels aren’t all the same length. You’ll need to go and trim them down, so they’re all the same length. (Yes, you’re gonna lose part of the tea towel design in places. But that’s ok.)
trim edges Collage

Step five:
Now it’s time to cut out your blanket backing. Place your square of tea towels on the sheet, and cut around it so you’ve got a section of sheeting the same size and shape.

Step six:
Take some of your leftover sheet fabric (or if you don’t have enough, use up some of your scrap fabric, or another tea towel) and cut four right-angled triangles. These are going to be pockets on the underneath of your blanket, where you can put stones or other small weights so the blanket corners stay nice and flat and don’t fly up with a breeze. These pockets need to be big enough for stones/small weights, so make them 15cm long from the right-angle point to the centre of the longest edge. Here’s what they’ll look like on your finished blanket:
corner

A quick way to cut out right angled triangles is to fold your fabric into four, take one corner of your blanket back, lie it on top and use it as a cutting guide. To save yourself some time, when cutting the triangles out, place the longest edge along the selvedge or hem of the fabric you’re using – that way, you don’t need to hem it. If you aren’t able to cut your triangles out with the long edge along a selvedge or hem, you’ll need to fold that edge under by 1 cm and sew it down to hem it.
cut corner

Step seven:
Take your four triangles, and attach one to each corner of the back of your picnic blanket, with the wrong side of the triangles against the right side of the picnic blanket back. Stitch them down with a 1 cm seam allowance along both of the short sides.

Step eight:
Now it’s time to attach the top and the bottom of the blanket to one another! Lay them on top of each other, right sides together. Stitch around all four sides with a 1 cm seam allowance, leaving a 15 cm gap in one side for turning.

Step nine:
Turn your blanket out the right way through the turning gap you left in one side. Press all the side seams. Press the edges of the turning gap under, so they’re nice and hidden on the inside of your blanket.

Step ten:
Top stitch all around the edges, about 3 mm from the edge. When you’re stitching over the opening, make sure you catch both the top and the bottom sides of the blanket so it gets sewn closed.
topstitch

And you’re done! 🙂